Crafting a piece of custom jewelry is painstakingly meticulous work where true excellence is measured on a microscopic level. Below is a detailed behind-the-scenes look at the fabrication process of our popular 3 Stones Engagement Ring.
Steps to make the 3 Stone Scroll Ring

Step 1) Inspiration

First, the client requested a diamond center with sapphire accents, and was looking for a nature theme but with a traditional approach.
Step 2) Sketch

After learning about the client and his story, Master Jeweler Jesh Rosestone drew up this preliminary sketch which the client approved as on the right track.
Step 3) Technical Drawing
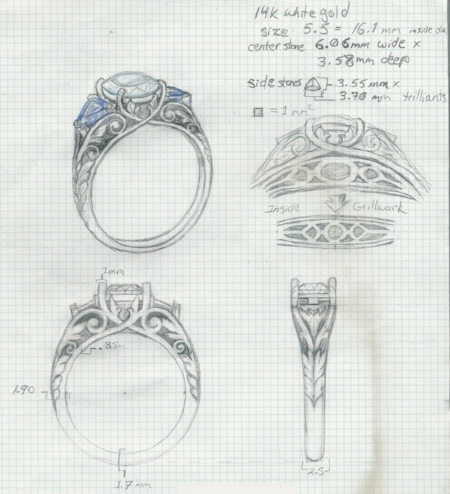
After agreeing on budget and time frame, the client selected the size of his stones and put down a deposit. Jesh put together a technical drawing that gets worked into a 3D CAD model of the finished piece.
Step 4) CAD Model

Based on the technical drawing, Jesh’s team puts together a 3D model of the piece. This step allows Jesh and the client to get a better sense of proportions and offer feedback for small design changes.
Step 5) Wax Model

Using the CAD Model, Jesh 3D prints a wax model of the ring that will be used in the metal casting process. The wax model is put on a wax tree, invested with plaster and then burned out in a kiln overnight.
Step 6) Gold Casting from kiln

Here you can see us pouring molten gold from the crucible into the hot mold of the rings.
Step 7) Break the Mold

The gold filled flask is then plunged into water while it is still hot. This causes the plaster mold to shatter.
Step 8) Clean the Plaster

After the mold is broken, the wax tree from before is now filled with gold and the piece is starting to come to life. The pieces are separated and the plaster is cleaned off to start the finishing process on the ring.
Step 9) Polishing and Refinements

This is what the ring looks like after all the plaster has been cleaned but before the metal has been polished. Notice all the fine bumps and pits. This is part of the casting process and all these imperfections must be removed by hand.
Step 10) Detailing

The ring is now polished and shiny. This is where most jewelers would stop but Jesh has dozens of hours of detailing to go.
Step 11) Chasing

Using a technique called chasing, Jesh carefully sculpts the leaves into these delicate flowing forms. This technique involves filling in the negative space with pine pitch to support the ring while Jesh hammers on it.
Step 12) Setting

Finally, the stones are set, the ring is buffed and rhodium plated, and ultimately, the piece is complete!

